
Want to avoid delaying issues from your boat engine? Also, getting unusual louder clicks while starting the engine is not a good sign.
We got you! Several other issues are there generated from the Mercury starter solenoid. In this article, we will give you solutions to avoid these circumstances.
So, what are the major Mercury starter solenoid problems?
Getting louder clicking sounds from the engine indicates having a major solenoid problem. You might see the engine taking a lot of time or delaying getting started. And, battery draining is another factor. Along with these, bad wiring or even excessive heating might be the case.
That’s not all! Explaining to you these in detail will make everything clearer. So, let’s jump to the core!
Top 3 Mercury Starter Solenoid Problems with Solutions
It’s time to explore the top 3 problems related to the Mercury starter solenoid!
Problem 1: Louder Clicks But Not Starting the Engine
Finding your engine unable to start in time? This might be the case with Mercury voltage regulator problems. However, solenoid issues share an equal possibility of this.
During this, you might hear a louder click sound while pressing the starter button.
At the same time, the start might not take place of the engine. Trying for another two or three times but the same result?
Then, you can consider this a solenoid-based problem. So, hearing a clicking sound by pressing the Mercury starter button can not ensure good motors. In the meantime, this situation might not depend on engine temperature.
The first thing is to check the carbon brushes inside the Mercury starter motor. And then, clean every possible obtainable connection.
Along with that, your re-installed engine must appear running like a beast as before. And, the solenoid won’t be sliding the piston back again. However, you should get solenoid valve problems with solutions if required.
Let’s start with engine checking.
For example, we have taken a 12V lamp between the two gigantic terminals on the back-solenoid. In this manner, you should try to restart the engine.
Now, we will hear a loud click but no motor running is there. As a result, the lamp won’t be shining too. It indicates no 12 volts current has arrived at the starter.
Solution
First of all, take apart the back part of the solenoid. It will lead you to have the heads of the copper bolts worn out earlier.
At the same time, you will find large washers pushed up against those two bolts. And, it is done for closing the rusty circuit.
Now, it’s time to rotate the bolts in their positions. It will expose fresh metal along with the cleansing of the washer.
However, we can not assure you the issue gets solved even after this.
So, having a second intervention is necessary here. It comes with placing fiber washers beneath the two large bolt’s heads.
As a result, these will get closer to the washer. In this manner, all possible tiring springs or even worn bolt heads are negotiable to avoid.
Problem 2: Faulty Battery Issue
Faulty battery might get your Mercury starter solenoid into trouble. You might find this issue among the Mercury outboard worse stator symptoms too.
In the same manner, solenoid issues can drain the battery too. Corroded battery posts are another trouble due to the faulty solenoid.
First, we need to diagnose the battery. A simple DIY process is enough to examine. Let’s jump on that!
Solution
Let’s get this to understand by following three major steps here!
Step 1: Setting the Multimeter
Set the multimeter to a direct current voltage. And then, join the red and black probe to the positive and negative battery terminal respectively.
In the meantime, you might find the multimeter indicating the battery output is fewer than 12V. If this happens, first charging or replacing in the first place is mandatory.
Meanwhile, you can assure having full charging if the battery gets 12/4 volts.
Step 2: Joining to the Terminals
Now, place the multimeter back to the direct current.
You require joining the red wire of the multimeter to the positive terminal of the battery. At the same time, connect the black wire with the negative terminal.
Step 3: Check Readings
It’s time to turn on the ignition safety. And, carry this to the start position. Along with that, start the engine.
In this manner, keep this activated for around 4 to 10 seconds. Don’t forget to read the voltage shown on the multimeter of the battery.
Pick the reading while the engine initially starts. What if you find the multimeter reading exceeding 9.5 volts?
It indicates the battery is in the right setup. While finding this lesser than 9.5 volts, the engine gets too high a drop in voltage.
As a result, you might face poor transfer in the battery. And, that’s the right time to get the battery replaced.
Problem 3: Engine Won’t Turn Over
Apart from the louder clicking sound, there is another issue with starter failure. You might find the starter doesn’t get activated while you push the start button.
Burned out motor might be the case here. At the same time, solenoid and relevant electrical issues might impact this issue.
Solution
Replacing the Mercury starter is the most common solution. However, this bad solenoid’s impact can be lessened through a simple DIY method. Let’s keep your budget shorter first.
First of all, disjoin the negative cable from the battery. And also, be confirmed that the cable is protected from the battery.
Next, extract the starter including bolts. Along with that, lower down the starter.
As a result, it will acquire access to the solenoid wiring.
In the meantime, work on removing the wires from your starter or the solenoid.
And then, keep them marked with the help of tape and numbers. However, a large positive battery cable suits a single terminal.
After that, installation of the new starter is required. Get this with original bolts. Then, ensure reattaching the wirings to the solenoid starter.
You have to maintain the wire connectors separated from each other. Also, keep them tighter for better results.
Finally, turn the ignition key on simply. And then, release it. As a result, the negative battery cable and test starter will get attached.
Now check if the starter cranks the engine and releases it or not. If you find these, then you have done right!
How to Test a Mercury Outboard Solenoid
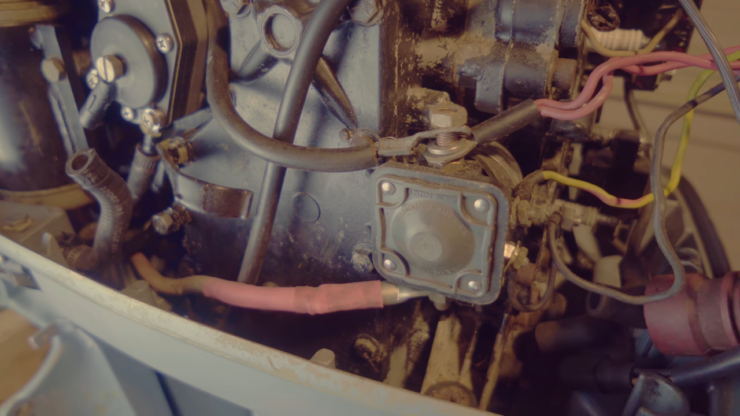
The solenoid on a Mercury outboard motor serves the purpose of starting the engine through remote activation. Its primary function is to initiate a high-amperage starter that requires a heavy-gauge wire to handle the load.
There are two large-diameter posts and two small-diameter posts on the solenoid. A heavy wire, typically 4-gauge or more, connects the B+ post on the solenoid to the starter through the other large post.
When the solenoid is not activated, an open circuit separates the two large wires. However, when power is transmitted from the key to the small terminal of the solenoid, it energizes and creates a closed circuit to the starter.
STEP 1
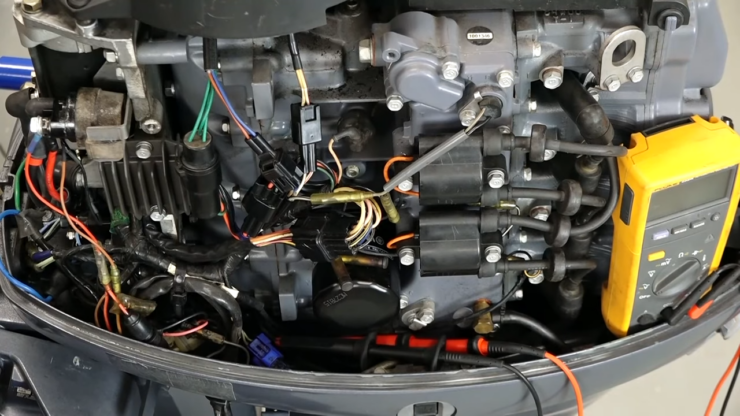
Voltmeter is set to 20 volts. Remove the cowl or engine cover from the engine to gain access to the solenoid. The solenoid on outboard is usually on right side of the engine, looking at it from back looking toward the front of boat.
STEP 2
Ground the black lead on voltmeter to block and touch the terminal end of large red wire at the solenoid with the voltmeter’s red lead. This wire must be the wire from the battery. The wire can be seen coming up through the lower cover. other large terminal can be seen going to the starter. There should be 12 volts at the terminal from the battery. If there isn’t, there is a problem with the battery or terminal.
STEP 3
Using a little wrench, remove the solenoid’s small wire to inspect it. As the key is turned to start, touch the red lead to the end of the little wire while keeping the black lead grounded as before. Every time the key is turned to the start position, there should be 12 volts.
The solenoid will be activated by this voltage. If there is no voltage when the key is turned to the start position, there is a problem with the wire to the switch exits or a bad switch.
STEP 4
The solenoid’s little wire needs to be reconnected. The solenoid should click and voltage should be present on the other large terminal if there is 12 volts applied to the large wire from the battery and 12 volts applied to the tiny wire while the key is in the start position. If the solenoid does not click for 12 volts, check this terminal.
If there is no voltage, the solenoid is bad and needs to be replaced. If there is 12 volts then the starter is bad.
FAQs
Can I Replace The Solenoid On A Starter?
Yes, you can! However, technicians do not always recommend this way to follow. The starter solenoid can disseminate electricity to the starter motor. And, the battery is the major source of it while turning the ignition key. Finding the starter solenoid in a worse mode requires replacement.
Can I Continue Driving My Boat With A Bad Solenoid?
Fortunately, yes! You might utilize a screwdriver having an insulated handle to make this working simply. You must control the fluid pressure to function in the gear. And, avoiding transmission stress is advisable. Along with that, visiting a technician for the replacement can be another option.
What Does A Bad Starter Solenoid Sound Like?
A bad starter solenoid might sound like clicking. You might feel it as a persistent grinding noise sounding like marble-shaking in a can. This loud clicking might have a faster or slower tempo. Meanwhile, no other parts in this mechanism will sound like this. Hearing this indicates buying a new one.
Can a Solenoid Be Reset?
A solenoid can be reset by turning off the power source that is powering it. This will cause the solenoid to deactivate and return to its normal state.
However, if the solenoid has a mechanical or electrical problem, simply resetting it may not fix the issue and further troubleshooting may be required.
What Burns out A Starter Solenoid?
Starter solenoids can burn out due to several reasons, including excessive heat, moisture, age, and wear and tear. High electrical current can also damage the solenoid, which can occur if the starter motor is being overloaded, or if there is a short circuit or loose connection in the electrical system.
In addition, using a battery with a low charge can put extra strain on the solenoid and cause it to fail. It’s important to properly maintain the electrical system and replace the solenoid as needed to prevent damage and ensure reliable engine starting.
Can You Bypass a Starter Solenoid?
Yes, it is possible to bypass a starter solenoid. This can be done by connecting a wire from the positive battery terminal to the positive starter terminal. This will directly send power to the starter, bypassing the solenoid.
However, it is important to note that bypassing the solenoid can be dangerous and should only be done as a temporary fix. If the solenoid is faulty, it should be properly diagnosed and replaced by a professional.
Final Words
Well, now you know the major Mercury starter solenoid problems. Hopefully, this article can enlighten you with this issue in many ways.
However, If you feel lost, there are ideal options like hiring a technician.
Stay safe and have a great day!
I’m Liam Jackson, the proud owner and driving force behind KayakPaddling.net. Born somewhere in the expansive beauty of the United States, I’ve nurtured a lifelong passion for kayaking and fishing that has led me to explore the far corners of our nation’s waterways.