

Mercury throttle control is a device that controls the speed of your boat’s engine. It is a crucial part of your boat’s control system, allowing you to accelerate or decelerate your boat with ease. The throttle control is typically located on the right side of your boat’s dashboard, and it is operated by a lever that you can push or pull to adjust the engine’s speed.
It is designed to work seamlessly with your boat’s engine and provide you with precise control over your boat’s speed. It is an essential component of your boat’s control system, and it allows you to maneuver your boat in different conditions, such as when docking, maneuvering in tight spaces, or navigating through rough waters.
Control is typically made of durable materials that can withstand the harsh marine environment. It is also designed to be easy to install, operate, and maintain. With proper care and maintenance, your Mercury throttle control can last for many years, providing you with reliable performance and safe operation of your boat.
Running a boat with a malfunctioning throttle can be a pain. It might even ruin the whole afternoon with its misbehavior.
So how to remove mercury throttle control?

To remove the mercury throttle control box, the control handle must first be removed. Both of the processes themselves are pretty easy. But the process can be tedious and might require removing the whole control unit.
That’s just a little bit about what you have to do. The whole thing is much more complicated but we have you covered! Just follow us to this article!
Removing the Mercury Throttle Control Handle
The mercury throttle control box assembly can not be removed without removing the control handle. Both of these processes are pretty easy. Anyone can do them with basic tools. So let’s see how to first remove the handle and then disassemble the throttle control.
How to Remove Mercury Throttle Handle?
Though the process of removal itself is easy and can be done by almost anyone. But removing the can is a hassle. We must open the whole control unit to do it.
So let’s dive into it.
Step 1: Placing the Handle in Throttle-only Position
In order to remove the control handle, we have to first remove the throttle-only button. We have to place the control handle in the throttle-only position. Then we have to push the “In” on the button and place the control handle forward.
Step 2: Removing the Throttle-only Button
Now we have to remove the Throttle-only button. We can try to remove the button using just our fingers. But sometimes the button cannot be removed with fingers. In that case, we will use a small screwdriver and pry it out. We have to be very careful about prying it out.
Step 3: Removing the Handle and Handle Bushing
For this, we will need an 11/16 wrench. We will use it to remove the 11/16” retainer bolt holding handle to the module. Once the retainer bolt has been removed, we have to remove the handle and handle bushing. Use your hands to remove them gently.
Step 4: Removing the Bezel
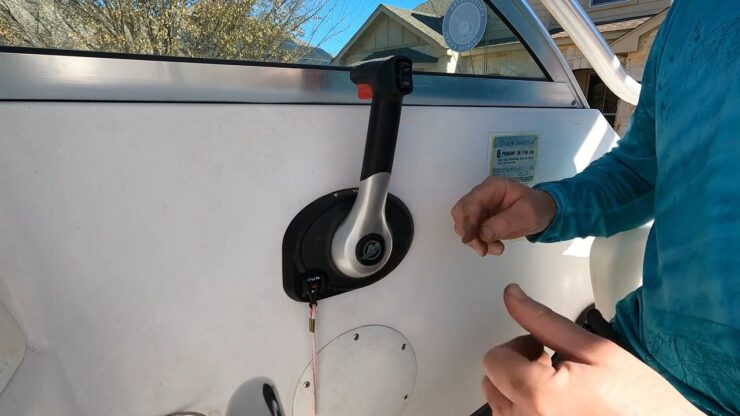
Now we have to feed trim wires from behind the bezel. Afterward, we will unplug the wire harness connector. Be careful so you don’t have to face throttle cable problems later. The bezel is under the bezel cover. So we will have to remove the bezel cover first.
Removing the bezel cover can be done using a small screwdriver.
There are three screws holding the module assembly in place. The screws fasten the module assembly to the bezel assembly. We will have to remove the three 250x20x.750 hex screws.
After loosening the screws, the module assembly can easily be removed. Now we can finally remove the bezel from the boat panel. But to do so we will need to remove screws and nuts holding the bezel in place.
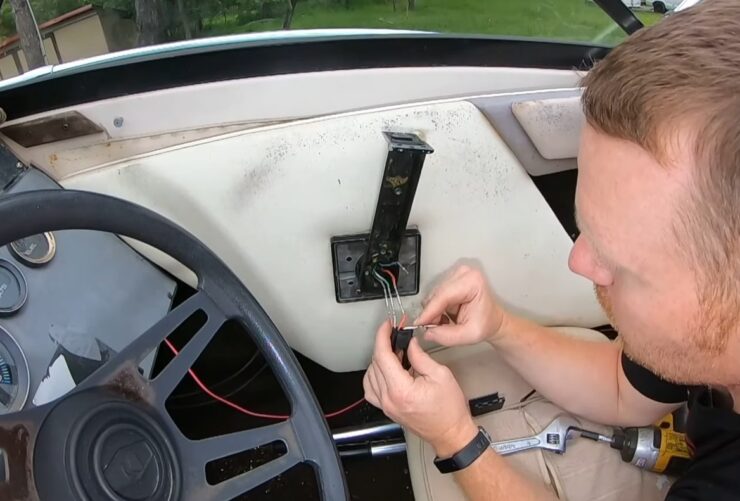
Step 5: Removing the Lanyard Switch
Now we have to find the lanyard retainer. The lanyard retainer can be found on the back of the bezel. To remove the lanyard switch we have to push up on the lanyard retainer. Next, we will have to locate the wire connections for the switch and unplug them. This is the same exact as an electrical connection. Or sometimes called a soldered connection.
Be considerate about the generation of cables if you replace them. There are some differences between mercury gen1 and gen2 cables.
Step 6: Disassembling the Handle
To remove the handle we will need to remove the friction screw. The friction screw should be somewhere near the bottom of the handle. To remove the friction screw we will need a ⅛” Allen wrench. Using the wrench we will remove the friction set screw.
Now to properly disassemble the handle we need to first remove the Phillip screw. And then the washer holding shift release. Now remove the release lever and spring.
Finally, we remove the Phillip screw securing handle cover to control the handle. Then we have to slide two components apart. And with that, the handle is out.
Step 7: Removing the Trim Switch
The last step is to remove the trim switch. If the control has a trailer switch, we can remove it with a trim switch.
Disassembling the Throttle Control
With the handle removed, we can work on disassembling the throttle control. This process is much easier and will not require you to make a big mess.
Some of us have the combined throttle and shift control, called the “remote standard controls”. Removing the remorse standard control is pretty similar to this process.
Step 1: Removing High Idle Mode Button
First, we want to remove the shifter from the boat. After removing the shifter, we will see a button for high idle mode. We will want to remove that button. to remove the button we have to just pry it off with a flathead screwdriver.
Step 2: Removing Shifter Nut
Up next is one of the most difficult parts. There is an 11/16 nut in the shifter. The nut needs to be removed. The problem is when the nut is severely corroborated. In that case, we might need an impact gun to pull it off. Even that might not be enough. We may want to use heat or penetrating oil to get it off fully.
Step 3: Undoing Center Section
We are going to start on the back side of the shifter. First, we have to undo the center section bolt. One side is a Phillips bolt and the other side is an eight-millimeter. Screwing both the screws will make the center section just come off.
Step 4: Removing the Throttle Linkage
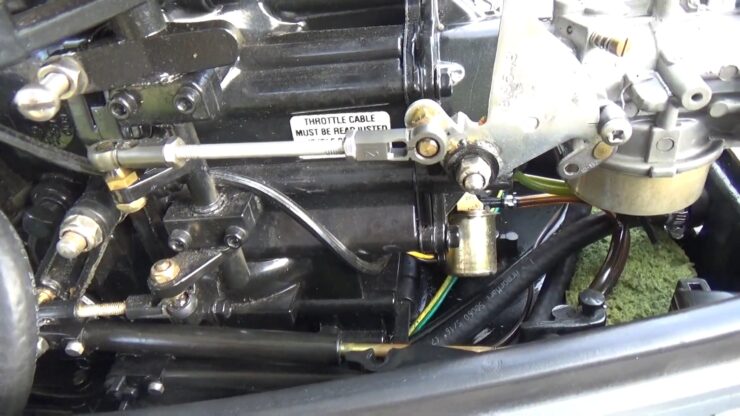
The next step is removing the Phillips right above the center section. This Phillips head might be tight as well, so we might need an impact gun here as well. After unscrewing, remove the piece held in place by the screw. Then we will see the throttle linkage. Take off the throttle linkage as well, it will come off automatically, do not force pull it.
Step 5: Removing the Neutral Safety Switch
Now we will see the plastic section held in place by 4 Phillip heads. Unscrew all 4 of them. Then the whole plastic will come off easily. We will see the neutral safety switch. The safety switch is the one with the long wire. The neutral safety switch can be very easily removed, just pick it up.
Step 6: Removing the Shifter
Now to remove the shifter. Give it a push from the back and the shifter should come off. If it is stuck because of corrosion, we will have to use penetrating oil. After removing the shifter, the shifter arm should come off easily. And with that, the whole throttle control has been disassembled.
FAQs
Here are some of the common questions people ask:
How do you grease a boat throttle?
Greasing a boat’s throttle is pretty simple. Fill the bag with enough engine oil to completely immerse the end of the wire jacket. Then zip it up. Place a container beneath the cable’s bottom end. This is to capture the oil that will ultimately leak out of the jacket’s lower end.
What is throttle friction on a boat?
The throttle friction makes operating the boat more comfortable and safer. The throttle changes the engine’s speed, which changes the spinning of the propeller. And that in turn propels the vessel forward or backward.
Can you use WD-40 on throttle cables?
No, you cannot use WD-40 on a throttle cable. Regular motor oil can be used if you do not have the correct aerosol product. But penetrating oil, such as WD-40, might gum up the slick inner sheath of some cables.
Are Mercury outboard throttle and shift cables the same?
Mercury outboard throttle and shift cables are not the same, although they are both important components of your boat’s control system.
What is throttle only button Mercury?
The throttle only button on a Mercury outboard engine is a feature that allows you to increase the engine’s speed without engaging the gear shift. It is a convenient feature for situations where you need to operate the engine at idle speed while still increasing the RPMs, such as when warming up the engine or navigating through a no-wake zone.
Conclusion
And with that, we know how to remove mercury throttle control. You will first need to remove the handle and then you can disassemble the control box. Follow our instructions properly and everything should go smoothly.
Good Luck!
I’m Liam Jackson, the proud owner and driving force behind KayakPaddling.net. Born somewhere in the expansive beauty of the United States, I’ve nurtured a lifelong passion for kayaking and fishing that has led me to explore the far corners of our nation’s waterways.